Wednesday, September 26, 2018

Zuru X-Shot Fury 4 Review


It never fails to amaze me just how far X-Shot has come in the past year. Previously, they had a ton of bizarre, cheap feeling blasters that weren't practical, didn't shoot all that well, and just weren't very good options, and in the past year they've become one of the best companies around for getting amazing performance for low cost. The newest blaster of theirs that I picked up is the Fury 4, a four shot revolver that is quite comparable to the Nerf Quadrant, but basically better in every single way. 

Contents


This is a very simple blaster, and as such, there isn't a ton in the box. You get the blaster itself, along with 8 X-Shot darts. The blaster is once again held in with Zuru's cool plastic screws, keeping the blaster secure in the packaging, yet easy to remove, without there being any ties going across it. The downside of these is that they require extra holes in the shell. On this blaster, there are two extra holes in the shell that run all the way through from one side to the other. 


I do very much appreciate the fact that Zuru packages more darts than the blaster holds with each blaster, there's nothing worse than getting a new blaster, losing one dart and then not being able to fully fill it. Including twice the number of darts than the blaster holds is a very nice touch. 

Overview


Much like the Swarm Seeker, one of the first things that stands out about this blaster is how light it is. The plastic is the usual X-Shot quality, and like the other X-Shot blasters there are tons of cool looking details all over. The blaster is a very simple design, with a 4-dart auto rotating cylinder in the front, and a simple pull back priming mechanism. The cylinder rotates on the prime, and seems to line up and index properly every time. The draw length is pretty decent for a blaster this size, and the priming handle is nicely rounded and easy to pull. The blaster's grip is a bit small for my hands, but since its a small blaster overall, this is to be expected. While small, it isn't uncomfortable, but my pinky does end up kinda falling off the bottom of it. 

Build Quality

Like any other X-Shot product, the plastic quality is decent. It doesn't feel nearly as sturdy as Nerf construction, but it doesn't feel creaky and cheap like some Buzz Bee blasters. The blaster uses stickers, which I'm never a fan of, and one of the stickers on my blaster was put on at an angle, adding a slightly cheaper feel. 


Everything on the blaster feels solid and well made, despite being lightweight and somewhat cheap. Nothing particularly stands out as being amazing or terrible, it is good enough that you won't feel like it could break, but it doesn't feel like it could survive being thrown around all the time either. 

Build Quality Grade: B-


Aesthetics


As I said in my Swarm Seeker review, I personally really like the aesthetic of the more recent X-Shot blasters, and the Fury 4 is no exception. The blaster just looks cool. The recent X-Shot designs have all had a slightly sci-fi feel to them, which I really like. The blaster actually has front and rear iron sights, although they're pretty tiny, and like with all blasters, not very useful. There is a fake tactical rail on top, which looks cool, but I'm not really sure why Zuru is still putting on fake tactical rails when they do have blasters with real tactical rails and accessories. The shell has a TON of cool little details, and it'll be very fun to paint one of these days. I like the color choice too, the white and dark blue with a bit of transparent blue for the priming handle looks futuristic, while still looking like a toy. Overall, the designers did a fantastic job with this blaster, and it is definitely one of the nicest looking pistols you can get. 


Aesthetics Grade: A


Performance

You might think that as a tiny, 4 shot pistol, this blaster wouldn't perform as well as the larger blasters in the X-Shot lineup, but that couldn't be further from the truth. In my own chronograph testing, I found that with the X-Shot darts it came with, it shot consistently around 78 FPS, and with other darts it was getting around 70. With an assortment of darts, I got an overall average of 70 FPS. However, my results were somewhat lower than others I've seen for this blaster, with many people claiming they had around 75 or higher with elites and 82 or so for the included darts. Even with my slightly lower numbers, the blaster performs quite well for its size. The similar Nerf Quadrant only shoots around 60 FPS. In my testing, the blaster was able to fire nearly every type of dart I own, with the predictable exception of old streamlines due to dart posts.
All of these darts fired out of this blaster just fine:


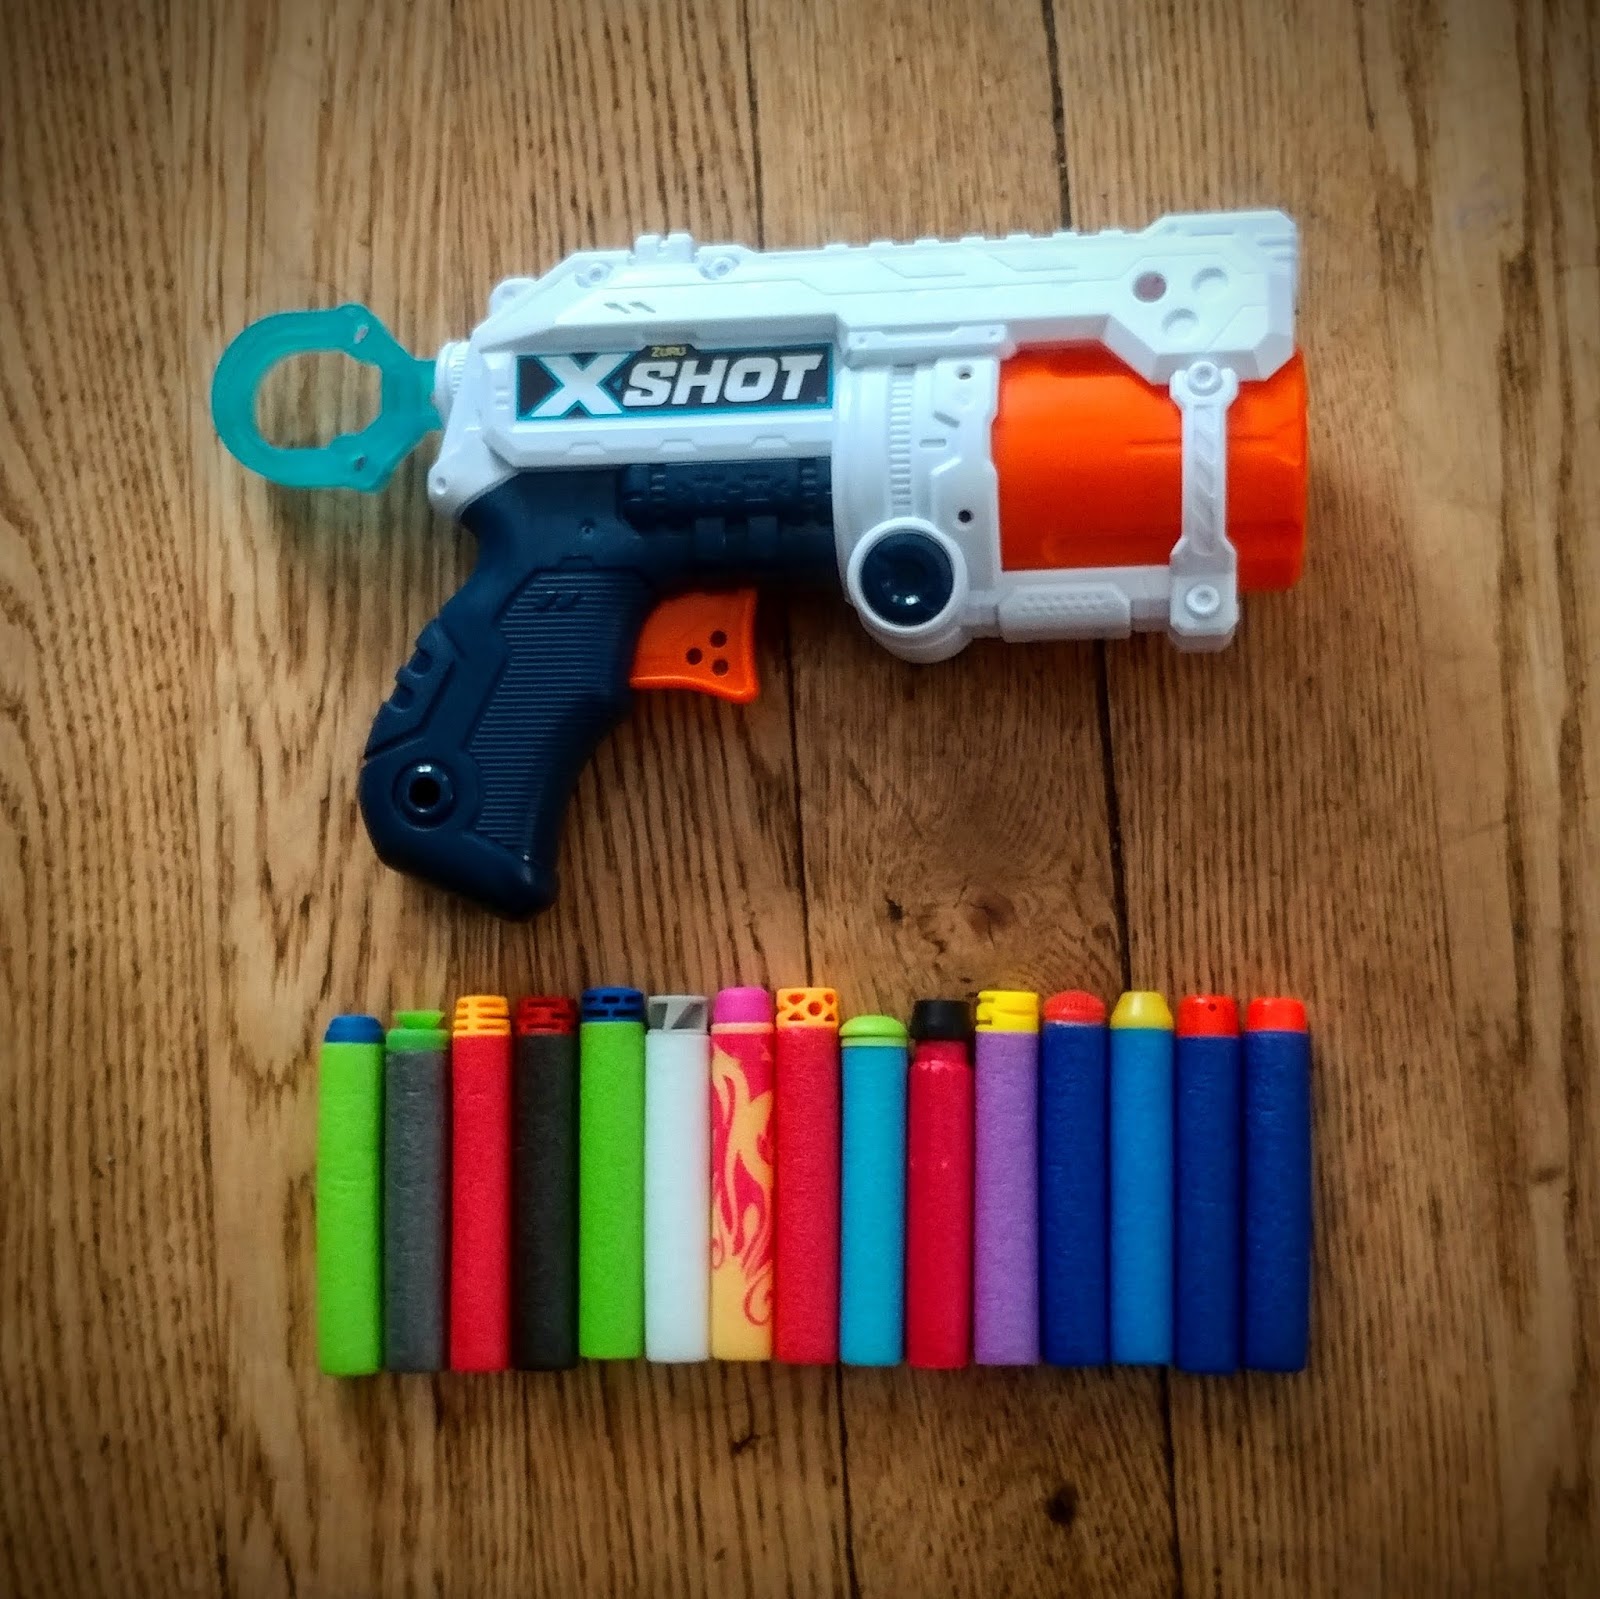
 For a small backup pistol, the performance of the Fury 4 is very good, and it will consistently shoot as well if not better than most out of the box Nerf blasters. 

Performance Grade: A-


Usability


The Fury 4, being a four shot revolver, is inherently not all that useful in a game. Obviously it can't be compared to a primary class blaster, but as far as pistols go, it is decent. If you want to carry a secondary, the Fury 4 doesn't have the best capacity, and there are many six shot revolvers that would be a better option. If you're looking for a small backup blaster though, the Fury 4 is a fantastic option. The biggest downside to carrying the Fury 4 in a game is that since there is nothing in front of the cylinder, the dart tips could be bent if it was put into a holster. If you use the included shorter X-Shot darts however, they barely stick out of the front. I wouldn't use the Fury 4 as my only blaster, but as mainly an HvZ player, I would certainly carry it as a backup to my primary. 

Usability Grade: B


Mod Potential


This blaster, like the Swarm Seeker, is incredibly easy to open up. No parts are glued or difficult to get apart, and all the screws are the same size, making it easy to reassemble. Once you open the blaster, you can see that the plunger tube is rather short, but decently wide.
The other plunger tubes here are the Stampede and a BOOMco Dynamag:


The plunger head is held onto the plunger rod with one screw in the side, making it easy to replace the spring. 


I tried a variety of springs, and none of the ones that I had fit into the blaster, being either too narrow for the plunger rod or too wide for the plunger tube. The AR is only held into the plunger tube with clips, so it can be removed without any trouble. The different color plastics on the body of the blaster come apart with one single clip per side, making the shell very easy to take apart to paint. 


While I didn't have any luck replacing or adding to the spring, given the proper size spring, it should be quite easy to get even better performance out of this pistol, and due to the shell coming apart, it would be easy and fun to paint. 

Mod Potential Grade: B-


Value For Money


When it comes to this category, X-Shot can't really be beaten. I purchased this blaster from Walmart for the full MSRP of $4.97. That's right, this 4 shot, auto-rotating, 75-80 FPS pistol with costs about the same amount as a Jolt. And it comes with twice its capacity of darts. There honestly isn't much more to say here. $5 for this blaster is ridiculously good. The Nerf Quadrant, which performs worse, looks worse, comes with fewer darts and has worse mod potential costs twice the price of this blaster. In our HvZ club we often say that everyone should own a Jolt, but why would you buy a Jolt when you can buy this instead? 

Value for Money Grade: A+


Final Grades


Wednesday, September 12, 2018

Mod Overview: My pump-action Helios, Esfandiar


I didn't own a Helios until NFStrike started carrying a 3D printed pump-action kit for them. Literally the day that they first posted an image of their upcoming kit, I knew I needed to have one, and I went out and bought a Helios, and then constantly checked their shop over and over until the kit was listed. I can't be sure, but there's a good chance that I was the first person in the entire world to buy this kit, since I was refreshing the page every few minutes the night that it went up for sale. I also bought a set of cheap sights to complete the look of the blaster. When I got the kit, I was so excited about it that I installed it, tested it, painted it and did some other work on the blaster all in the same day to create Esfandiar. 

The first thing I realized was that while I love the Helios, the stock was too short and too slippery to be reasonably usable. I searched around my parts until I found the stock from a Deploy, and I decided it was a perfect fit. I simply cut the back off the Deploy stock and epoxied it onto the back of the Helios, with no cutting done to the Helios shell at all. I did, however, have to make one cut on the blaster itself. To get the kit's picatinny rail on top of the blaster, you have to cut down the front sight, but that was an incredibly quick and easy cut.


While I was doing that, I realized that the 3D printed barrel ended very abruptly, and wouldn't have a good spot for an orange tip. I cut a small circle of PVC pipe and glued it to the front of the barrel from the kit to add a proper orange tip. When that was done, I used some epoxy putty to smooth the transition between the Helios and the Deploy stock. Honestly, its probably my worst epoxy putty work ever, but oh well. I sanded the 3D printed parts heavily, trying to avoid the awful sound of 3D print rubbing against other 3D print. When I got to a point that I thought was good enough, I Started painting. I chose a bright green color for the blaster, since I realized I didn't have much that was green. The paint I chose was truly terrible. It was Rust-Oleum Premium High Gloss, and for some reason, it didn't want to stick to anything. I usually use Rust-Oleum paints, and they work well, but I have no idea what was up with this can. It took me a ton of coats, and I ended up having to re-tape and re-spray some parts, but I finally got everything painted. 


I chose the name Esfandiar for the blaster, and my mom, who has much better handwriting than me, added it to a good flat spot on the blaster. Unfortunately, we didn't realize that the name would be directly under the priming bars, so you can't actually see it on the finished blaster. The name Esfandiar comes from the name of a Persian hero from the epic Persian poem the Shahnameh. My name, Katie, is short for Katayoun, who was Esfandiar's mother in the poem, so it seemed a fitting name for my blaster.


With the blaster painted and reassembled, it was time to add the pump action kit.


The epoxy putty work around the stock still bothers me a little bit, but the blaster is otherwise awesome. From the metal rods and the 3D printed parts, its probably my heaviest blaster, and I love the overall aesthetic. I highly recommend the pump-action kit from NFStrike, it makes the Helios a lot more usable, and it looks good doing it! A lot of people were wondering if the spring-assisted return on the Helios still worked with the pump kit on, so I filmed a video of me firing it to show to people that it does indeed. 


This was a pretty short mod overview because it was a pretty simple mod, but I do love the way it turned out. Someday I'll actually re-write the blaster's name in a spot where you can actually see it.


Mod Overview: Minimized LPA MA5 SMG


One of my favorite creations I've ever built is my minimized Halo MA5 that runs off an air tank in a backpack. A lot of people seem to like the blaster, so I figured I'd take all the old pictures that I took while making it and put them together with some commentary about the build process. I decided that I wanted to try building a blaster that runs off of a low pressure air tank after re-watching Zombona's LPA Rapid Madness video. I decided to base mine off of the similar Halo MA5 Assault Rifle however, because I like the narrower profile of the MA5. When I started the project, I didn't really have any idea what I was doing or what it was going to look like at the end. I started the way I start a lot of my mods, by making a really quick and dirty photoshop mockup. This is what I created:

The first image was simply me looking at an internals diagram of the MA5 and cutting it down to its bare minimum, the second picture was me trying to add some features and fill it out a bit. From there, I started assembling my parts. This was my first ever LPA build, and my first time ever really working with air fittings and hoses, so I spent a LOT of time watching guide videos or reading posts on r/nerf or facebook to try to figure out what I needed.


Once all my parts arrived, I made sure I could make the internals work before I started on the external work, since I wanted to be sure I wouldn't cut off anything important. At this point, I didn't think I'd be able to run my air line out the handle of the blaster, so I had it running straight out the back after I cut the stock off. 


This is unfortunately the only picture I took of the internals, after I'd already done some of my minimizing. The stock air tube can be cut and shoved directly into a push connect fitting, which then screws into the top of a valve the fits with minimal cutting into the stock valve's location. Another push connect fitting screws to the other side of the valve, which then connects to a bit of hose that later ran down to the base of the handle, and then another push connect, screwed into a quick connect coupler. 

Once I knew the blaster functioned, it was time to figure out what I was going to make it look like.


I knew I needed something big to fill the gap in the bottom where the pump went. First I was going to use the back chunk of the stock, but it wasn't really the right size or shape. 


I tried out the original pump grip as well, and I liked it, but it had to be cut down.


I filled the hole in the back of the blaster with the back of the original stock instead, and I built a new front out of acrylic sheet. I made sure to cut the acrylic in half so that the blaster could still be opened in case of any problems.


Covering the top hole proved to be the most difficult. Due to my cutting, there were no screws near the top of the blaster to hold it together, so if I had done the same thing I did for the front and simply cut a piece of acrylic in half, the blaster would have had a huge gap at the top. Instead, I cut 4 tiny pieces of acrylic and drilled a hole through each one. I took the smallest nuts that I had, and glued one to the back of each piece, lined up with the hole. Then, I glued each piece with its nut to the upper inside edge of the top hole, and added a ton of hot glue around them for some support. 


Once those were dry, I cut out my top piece of acrylic, lined it up on top, and marked where the holes in the other 4 pieces were. I drilled holes in my top piece, and then I was able to screw it in to place with small bolts. Its kinda an over-complicated solution, but it works. 


With everything in place, I used some epoxy putty to smooth out the area around the acrylic front, the stock piece, and to give the base of the handle a bit of a foot rather than the smooth sweep it had before. I didn't take a picture after the putty work, but you can see once it was primed what I did.


I knew I wanted to do the blaster in a blue color, so I chose my blue and gave it a base coat. The paint I used was Rustoleum Painters Touch 2x. Once the base coat was done, I used a brush and some acrylic paint to add some grey and black, and to give it an orange tip. 


I came up with a silly backstory for the blaster:

"2053 - Post Zombie Apocalypse

The base seemed empty, but she wasn’t going to take any chances. Not after what happened last time. She stepped carefully, keeping herself on full alert. Just because she didn’t see anything didn’t mean they weren’t here. As she rounded a corner, she stopped abruptly. A lone Z shambled slowly down the hallway. She was about to move on, when she noticed it was carrying what looked like a weapon of some sort. She needed to get a better look. Drawing her knife, she quickly ran up behind the zombie and dispatched it with one quick strike. As it tumbled to the ground, she caught the weapon and pulled the sling from around its body. Turning it over in her hands, she knew she had found something special. The weapon was unlike the old fashioned powder weapons that most people still carried. It seemed to be some sort of electromagnetic accelerator. Perfect, she thought. This would be a great project to occupy herself with.
Back at her makeshift workshop, she set to work. The first problem was how big it was. Too big for her to maneuver quickly. A few easy cuts solved that issue. Now to solve the power issue. An accelerator like this required a lot of power, and any battery setup in the weapon itself would make it too heavy. She decided to use an old backpack, housing a rechargeable battery to feed power to the weapon’s capacitors. A few fabricated parts, a hasty paint job, and the weapon was perfect. She stayed up late that night trying to come up with a fitting name for her new creation, but a perfect name didn’t come. Perhaps a name would come once it was tested in battle."

Since I knew I'd be using it for HvZ, I decided to go with a post apocalyptic look for it, and since I've always been fascinated by electromagnetic accelerator weapons, I wanted to make it look like it could be one. I added yellow stripes to the black stock to invoke a high voltage warning, and I glued some random bits of wire to the sides. I used some zip ties to attach an old charging cable from an RC car battery to the air hose to act as the weapon's power supply. I also pulled out an old plastic model airplane kit and stole the decals, adding a few random bits of text and details to mostly hidden spots on the blaster. For my weathering, I took an old sock and a random bit of foam that I had lying around, and dipped them in black and brown paint before rubbing them all over the blaster. I used a brush to drybrush some silver over parts that would have been worn down, and I added some rust spots using a brush and a few different colors as well.


After I was done with my weathering, I wasn't happy with the way the air hose fittings looked coming out of the blaster, so I added a cloth wrap around the handle and the body of the blaster to cover the fittings and to add to the post apocalyptic look. I made these by tearing strips of white fabric, and then rubbing them around a bowl with some paint and a bit of water. I also at this step added a piece of picatinny rail to the top acrylic plate to break up the smooth top of the blaster. 


With the air hose attached, it was ready to go! 


The blaster has a variable rate of fire, since there is a regulator attached to the tank that can be adjusted. The tank also has a pressure gauge at the top, a schrader valve on the front to fill it, and a dump valve on the back to empty it. The tank can go up to 100psi, and I can quite quite a few shots with that, I haven't counted the exact number, but its plenty for a mission of HvZ. The backpack came from a Goodwill, and it got the post apocalyptic treatment too.There are holes cut in the backpack to access the pressure gauge, the fill valve and the air hose quick connect coupler. 


Overall, this was an incredibly fun and successful project. The blaster looks awesome, it functions great, and I love it! I still don't have a good name for it yet though...


Zuru X-Shot Flying Bug Attack Swarm Seeker Review


People who know me tend to know that for some reason, I love harmonica magazines. I tend to run BOOMco blasters, which have harmonica magazines, and I also am one of the few people who loves the Battlescout because of its dumb harmonica magazine. While I haven't gotten around to picking up an X-Shot Regenerator yet, when I saw the Swarm Seeker, I knew that it was a blaster that I had to have. I picked mine up for $19.99 at Target the other day, and it is already one of my favorite blasters.

Contents


In the box you get the Swarm Seeker blaster, a 10-dart harmonica magazine, 12 X-Shot darts, a bug launcher, and two flying bugs targets. The blaster and bug launcher are held into the box with some neat plastic screws that are very easy to remove, but the blaster has three extra holes in its shell from where the plastic packaging screws attached. The clip is held in with zip ties, and the darts and bugs are in their own plastic packages. 

Overview

The first thing you'll notice when you pick up the Swarm Seeker is just how light it is. Seriously, it has to be less than half the weight of a Kronos. The plastic definitely feels slightly worse than Nerf plastic, but still far better than Buzz Bee plastic. The green parts of the blaster have a slight texturing that makes it feel good in the hand, and the brown parts have a wood grain texture, while the orange and grey parts are smooth glossy plastic. The grip is rather comfy, with the small exception of a random circle that sticks out a bit at the bottom which is a bit annoying to have pressing into your hand. The harmonica magazine is transparent blue, and instantly I was able to tell that it is quite a bit smaller than the Battlescout magazine, despite holding the same number of darts. Comparison:


The darts are the standard X-Shot darts, shorter than other brands, and quite a bit lighter. 
The tips on my darts were rather inconsistent, some were definitely not glued on quite centered, but they all fire and function fine. The bug launcher takes 4 AA batteries under a door with two screws on the bottom, and it feels quite solidly built. The flying bugs themselves are very light and their bodies are hollow, but they don't feel fragile. The two bugs are different colors and are different molds, with slight but noticeable differences.
Size comparison:


Build Quality


The Swarm Seeker blaster feels well built, despite clearly being made from a slightly worse quality plastic than that used by Hasbro. Some parts look and feel a little bit cheap, but its definitely not a big issue. The plastic feels decent in hand, with minimal creaking. The harmonica magazine is very rigid plastic, with absolutely no flex or creaking, it feels great.

The bugs are very light and feel cheap, but they have to be light to fly. The bug launcher is the most solid feeling piece, and it seems like you could throw it around without any damage. Overall, while it isn't the best quality blaster I've ever held, its significantly better than the worst blaster construction, and I have no concerns about longevity.

Build Quality Grade: B


Aesthetics

I know for some people, aesthetics don't matter, but I've always been a fan of things that look good. Personally, I think the Swarm Seeker is, appearance wise, easily in the top 3 blasters that Zuru has ever made. The shell has a lot of details built into it, with tons of little ridges and indents and even some greebling that breaks up the surface well without being too disconnected and chaotic. The shell reminds me a lot of a Kronos, but I personally slightly prefer the Swarm Seeker's appearance to that of the Kronos. That being said, I do have two minor issues with the Swarm Seeker shell. When you get it, the blaster is held into the packaging with three small plastic screws. These screws are easy to remove to make unboxing the blaster quick and easy, but they leave three small holes in the shell that run all the way through. I wish the screws had gone into existing screw ports or something, but the extra holes could be easily covered or filled if they bother you. Secondly, the blaster has two huge stickers, one on each side. The stickers are smooth and well applied, but with extended use they will certainly begin to wear off, making the blaster look worse over time. Despite those two minor issues, this blaster is one of my favorite blasters aesthetically. The shell has exactly the right amount of texturing and detail, and it looks fantastic from any angle.

Aesthetics Grade: A+


Performance

Out of the box, this blaster performs great. Depending on the darts, the Swarm Seeker shoots between 75-85 feet per second, which is decently above the "standard" for Nerf blasters. I tested the Swarm Seeker with as many different darts as I could find, and it will fire pretty much anything. Out of the box, the only darts that it struggled with sometimes were darts that didn't reach the bottom of the clip, as they weren't entirely engaging the air restrictor. Despite that, I was able to fire all the typical darts, Elites, waffle tips, X-shot, Dart Zone, Koosh, etc. and even pretty much any old dart, including suction cup darts, velcro taggers, whistlers, buzz bee suction cup darts, and even streamlines. Despite being built for the slightly shorter X-Shot darts, this blaster is compatible with nearly anything you can put in the magazine.

 Both these clips fired every dart out of the blaster:


Performance Grade: A


Usability

Inherently, harmonica magazine blasters that fire foam darts are going to be less usable than those that don't. The harmonica magazine is simply too large for the number of darts it holds to make it as economical as a more conventional magazine fed blaster, and the fact that it is likely no one else will have harmonica magazines that you can borrow at a game makes it even harder to use effectively.
Magazine size comparison:


 If you're playing HvZ or having a long war, you can definitely reload the magazine as you fire, which is useful, but since the blaster only comes with one magazine, you'll find yourself reloading very frequently. If you're gonna play really quick games, where you might only fire 10-30 shots, reloading the magazine is quite easy, and if you get used to the way the blaster functions, you can be fine just reloading your 1 magazine.

One of my least favorite features on this blaster is how you insert the harmonica magazine. On the Battlescout, the magazine is inserted properly when it is flush against the side of the blaster, but on the Swarm Seeker, the magazine has to be only halfway through the blaster.

This makes it quite a bit harder to reload quickly, since if you're not careful with your magazines, you can easily skip your first dart. However, if you get used to this system, it shouldn't cause too many issues. One feature on this blaster that is much better than the Battlescout however is that the magazine indexes properly every time, and doesn't fall out at the end. The Battlescout has a tendency to not line up the magazine properly, resulting in shots that only go 10 feet or so, and if you're not careful, at the end of the Battlescout magazine, it sometimes ejects it out the side, which is really frustrating if you're actively running around. The Swarm Seeker doesn't seem to have either of these problems. In all my testing, it has indexed and fired properly every single time, and the magazine has never fallen out when I don't want it too. This blaster isn't what I would call practical, but if you're looking for a small blaster with a relatively high capacity and you don't mind having to reload your 1 magazine over and over, it isn't that bad.


As far as the bugs and launcher, they seem to work pretty well. You step on the button on the launcher to allow it to spin up the bug's rotor, and then you release the button to launch the bug. They are quite difficult to actually shoot down, as they don't fly all that long and they're rather small targets, but its a fun gimmick and they work well for what they are. You can also buy refill packs of the bugs, in case you manage to lose yours, or if you simply want more. I've already been brainstorming ways to use the bug launcher in wars, perhaps as some sort of objective, and I definitely think that can potentially be useful beyond just working as a target.

Usability Grade: C+


Mod Potential


Opening up this blaster is incredibly simple. All the screws are the same size, so you don't have to worry about getting them mixed up, which is very convenient. There are some hidden screws under the slide, meaning you have to remove the slide first, but there isn't any solvent weld or other complications. There is a small metal pin and an extension spring that might fall out, but the insides are remarkably simple. The plunger tube is rather short, but is very wide, moving a good amount of air.

Comparison to some random other plunger tubes I had lying around, from top to bottom: Swarm Seeker, Slingfire, BOOMco Dynamag, Stampede


The front of the plunger tube is simply clipped on, and I was able to remove the air restrictor in about 20 seconds with just my screwdriver.
The plunger rod itself is also quite wide, and many of my spare springs wouldn't fit around it, but I was able to find a large spring and put it in. My replacement spring was a few inches longer than the stock spring, but was able to catch fine. The only concern I had with modding this blaster is that the spring stop is a rather flimsy plastic, so I'd be cautious about putting in anything super strong unless you reinforce that. Getting the blaster back together was a bit of a pain, simply because my longer spring didn't want to keep the plunger in place, and I had to be a bit creative to get it together, but it worked in the end. Be certain that your plunger rod is the right direction, as the nub on the bottom of it has to catch on the magazine advancement mechanism to function. With a few minutes of simple modding, I removed the AR and upgraded the spring, getting noticeably better performance. EDIT: Now that its been nearly a week since I modded this blaster, I finally got around to chronographing it. With my simple spring replacement and AR removal, it shot an average of 96.2 FPS, with several shots hitting over 100.

One other amazing feature is that the shell actually is made in 4 different pieces,
and they come apart easily with clips. This means that it would be incredibly easy to paint the different shell pieces different colors without needing tape. Additionally, if you aren't a fan of the Bug Attack slime on the top of the blaster, it is simply clipped on too, and comes off very easily, albeit leaving a somewhat weird gap.
If you get this blaster and you have a screwdriver, you can at least remove the AR and paint it easily, which is awesome. 

Mod Potential Grade: B+


Value for Money

I paid $19.99 for this blaster, which is the typical price. For the money, you get a fun, easy to mod, very cool looking blaster, but honestly, the blaster itself isn't worth $20. The downside is that you also get the bug launcher and the two flying bugs, which are cool, but raise the price. If you really like harmonica magazines like me, or you think you have a use for the flying bugs, its definitely worth the price, but if you just want the blaster, or for some reason just want the flying bugs and launcher, it might not be worth it. That being said, $20 is far cheaper than any similar Nerf product would be, making it still a fairly good value.

Value Grade: B-


Final Grades